Preparing Data to Import Companies
Start your import by making sure your spreadsheet is clean. You will want to make sure that all of your columns are clearly labeled with appropriate headers. You may need to use excel functions like text to columns to make sure that you are importing all of the necessary data.
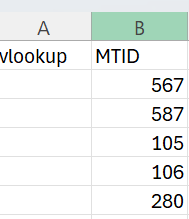
Typically, for urgent client communications, you are just going to need company name, MasterTax ID, and a blank column for Record ID.
Once your sheet is organized, go into HubSpot and create a company view that includes client companies and has MasterTax ID as one of the columns. Then run an export of the view.
Use the export button on the company view to export all of the company records. Choose CSV as the file type for your export to make sure the spreadsheet keeps all of the leading zeros that might be in a MasterTax ID. You will receive an email when HubSpot finishes processing the export.
Download the file in the email. You will want to copy the entire record ID column and the MasterTax ID column. Record ID will always be the leftmost column by default. Copy both of these values into a new sheet in the spreadsheet you were working out of earlier.

You will then want to use the vlookup function to match the company’s MasterTax ID to the HubSpot Record ID on the company level.
To do so, you will want to copy the MasterTax IDs from the first sheet of the spreadsheet into this new sheet. Create and make sure that the vlookup column is immediately to the right of the MasterTax ID column from the first sheet (column B MTID).
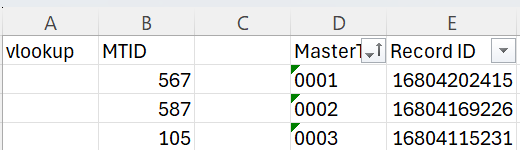
Group your MasterTax ID and Record ID columns together (D&E). Then sort the columns by MasterTax ID from smallest to largest. Once done, your new sheet will look like the image below. Columns D & E are from the second sheet.
You can now use the vlookup formula to match MasterTax IDs from the first sheet of the spreadsheet to the record ID in HubSpot.
When performing your vlookup, be sure to use dollar signs around the MasterTax ID and Record ID table so that the whole thing is included in the lookup. Your formula will look like the image below.
B2, = Value we want to find in the vlookup "table" (cell B2)
$D$2 = Cell where the vlookup will start (D2)
$E$906 = Cell where the vlookup will end (E906)
,2, = the column to pull from (column E)
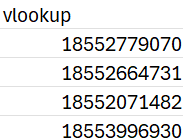
The end result of your vlookup should look like the image below. You should paste these values from column A (record IDs that you need) into the first sheet of the spreadsheet into the empty Record ID column you created. You now need to delete the second sheet, as HubSpot imports can only have one sheet.
Issue with Vlookup?
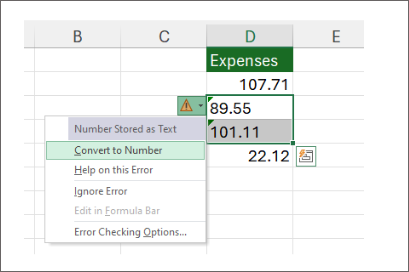
If you're having trouble matching up values, you may see a green triangle on the top left of the cell. If you highlight all of the cells within this column and then click the exclamation mark at the top of the column, you can convert all these to numbers.
Typically you're going to see this in a general data field, like if HubSpot record ID's are exported as a general field and it needs to be a number. Changing the cell type to a number from the excel menu bar, usually,on't do the trick.
Changing the cell type to a number from the excel menu bar, usually won't do the trick.
Importing Companies in HubSpot
You are now ready to begin importing your data. Click on the import button in the top right.

Then you will click on "start an import". You will want to select "import a file from a computer". Next, select "companies" and then click on "next". Choose the file you wish to import and click on "next" one last time.
You are now going to map properties on the company level. HubSpot can automatically map some if they have the same name, but you should review these to make sure they are mapped correctly.
Since you really only need the company Record ID to create your list, you should choose to not overwrite the properties which will import the data but not make any changes if a value is known. You can also choose not to import a column and no data will be brought into HubSpot. At the end of the day we don't need to import any data, just need to create an import membership to create our email list later.

There's no reason to check "don't overwrite" for Record ID, as that can't be overwritten by default.
You will want to ensure your mappings look like the image above. A green checkmark lets you know that the column is ready to be imported. Once all columns are mapped, click on "next". You will need to name your import before finishing the import. You will want to name it something that you will be able to find later.
Once you finalize the import, the data will be pulled into HubSpot. You will receive an email notification once it finishes processing.
Creating a List for Your Email
Once you receive this email, you will be able to get started making your list. Click on "create list" in HubSpot and select "contact-based". Give your list an appropriate name and set it as an active list.
Change the "filtering on" dropdown to "companies" and select "import membership" for the property you want to filter for. Choose the import you just performed.

Once this filter is in place, click the "add filter" button on the left hand side where your filter group is displayed:

This time, set the "filter on" dropdown to "contact", select "contact properties", and search for UKG contact type. Choose all of the options you need to send the email to.

Make sure to save your list. Lists usually take a moment to process.
Sending Client Communications
Once your list has been processed, you are able to use it as the send list for an email.
Congrats! Your import is done!